Wellington Security Systems FAQs
Find the answers to some of the most common questions we get at Wellington Security Systems. You can find information on Digital Watchdog, the Virtual Keypad, our services, and more. If you can’t find the answer to a question you have, don’t hesitate to contact us!
Where do I order more cards or fobs?
Email ADM@wellingtonsecurity.com or call 612.822.4094
Where do I pay my bill?
Digital Watchdog:
Recording video:
Recording indicators in the Resource Tree
When recording is enabled, the device is marked with a small red circle to the left of its name in the Resource Tree:
– indicates camera is recording
– indicates a recording schedule is established but the camera is not recording at the moment. Note that a license is still being used even though the device is not currently recoding.
Exporting video:
DW Spectrum has flexible video export capabilities which allow operators to find an export video from single or multiple cameras in different formats and variable speeds and with embedded system-generated information like Timestamps, custom logos/images, custom text, and operator info.
Exporting Video from a Single Camera Select the camera/video you would like to use to begin your export:
- On the Timeline / Playback Panel click and drag to highlight the time period you would like to export in blue.
- Right-click the newly selected area (now highlighted blue) and select Export Video to launch the Export Video dialog.

- When the export is complete see the exported file in the Localfolder, and you can directly drag the file into the main screen to play the video.

Exporting Video from Multiple or Single Cameras:
- Select the cameras/video you would like to use to begin your export.
- On the Timeline / Playback Panel click and drag to highlight the time period you would like to export in blue.
- Right-click the newly selected area (now highlighted blue) and select Export Video to launch the Export Video dialog.
- In the Multi Video tab, you will see a preview of the video you would like to export.
- Multi Video Export Options include:
- Make Read-Only – creates a .nov (Network Optix Video) or .exe (executable) file which can only be viewed, preventing additional video export.
- Protect with password – allows protection of the .nov or .exe file with a user-generated password.
- Click Export to start the export and browse to the location the file should be exported to
- An indicator of export progress will be shown
- When the export is complete users can browse to the file and double-click to open.
Watermarking:
All exported video from an Nx Witness System contains a system-generated Watermark which can be used for analyzing video authenticity.
Watermark allows users to check for validity of footage to determine whether or not any modifications were ever performed to the native footage. Any videos exported by DW Spectrum (either single camera or Multi-Videos) can be checked for validity.
To check the validity of exported videos:
- Bring the desired video onto the layout
- Open the context menu (right-click on the video) and select “Check File Watermark” (shortcut Alt+C)

- If the file is in its original state, the check will succeed. If any modifications have taken place, the check will fail.
Using the Timeline:
The Timeline itself and the scrollbar respond to a broad set of mouse wheel, mouse click, and button commands.
Click on the desired date and time on the Timeline to select it. If archive exists at that point, the time marker is placed at that point. If not, the time marker jumps to the beginning of the next recorded segment. Playback will begin in real time if playback is active. If playback is paused, the time marker position and content remain static until you click elsewhere on the Timeline.
If the desired point in time is not currently visible there are several ways to locate it.
To scroll the Timeline
- Click-and-dragthe scrollbar back or forth to the desired position.
- Use Ctrl+mouse wheelover the Timeline or scrollbar.
To scale the Timeline
Scaling is centered on the cursor unless the cursor is at the very end of the Timeline, in which case scaling is anchored to that end point. The scrollbar scales with the Timeline to indicate how much of the total Timeline is currently visible on screen.
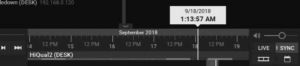
The white time marker indicator shows the location of the time marker in relation to the current Timeline display. For example, in the illustration above, the scrollbar is small because only a small portion of the total Timeline is visible, and the scrollbar overlaps the time marker indicator because the time marker is currently visible.
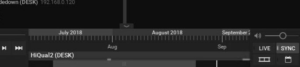
In the second illustration, below, the scrollbar is large because a large portion of the total Timeline is visible, and the scrollbar does not overlap the time marker indicator, because the time marker (which is still at 9/18/2018) is not currently visible.
- Use the mouse wheel over the Timeline or scrollbar to zoom in (smaller time increments) or out (larger time increments).
- Click on the scale buttons to zoom in (
 ) or out (
 ) by 10%. Double-click to zoom by 20%.
 - Click and hold the scale buttons for rapid zoom.
- Click in the scrollbar background area to scroll “screen by screen” in increments the size of the current display. Double-click to scroll by two screens.
- Double-click on the scrollbar to zoom out to the maximum available view.
To control playback speed
Press Space to toggle between play and pause.
Press ![]() to play at actual speed.
to play at actual speed.
Press ![]() to pause.
to pause.
Press ![]() or Ctrl+Right Arrow to fast forward. Available speeds are 2x, 4x, 8x, and 16x.
or Ctrl+Right Arrow to fast forward. Available speeds are 2x, 4x, 8x, and 16x.
Press ![]() or Ctrl+Left Arrow to rewind. Available speeds are -2x, -4x, -8x and -16x.
or Ctrl+Left Arrow to rewind. Available speeds are -2x, -4x, -8x and -16x.
Press ![]() or X to jump forward to the next recorded chunk.
or X to jump forward to the next recorded chunk.
Press ![]() or Z to jump backwards to the previous recorded chunk.
or Z to jump backwards to the previous recorded chunk.
When paused
Press ![]() or Ctrl+Right Arrow to jump to the next frame.
or Ctrl+Right Arrow to jump to the next frame.
Press ![]() or Ctrl+Left Arrow to jump to the previous frame.
or Ctrl+Left Arrow to jump to the previous frame.
Press ![]() or X to jump forward to the next recorded chunk
or X to jump forward to the next recorded chunk
Press ![]() or Z to jump backwards to the previous recorded chunk
or Z to jump backwards to the previous recorded chunk
If you press a rewind button while in Live mode, the mode will switch to archive playback. If you press a fast-forward button while viewing archive, display will switch to Live mode if the current time is reached.
Use the Speed Slider to temporarily change playback speed. This is helpful for previewing images that bracket the current position. Drag-and-hold it to the right for fast forward or to the left for fast rewind, also in 2x, 4x, 8x, and 16x increments. Release to return to 1x speed (during playback) or 0x (when paused). If playback is on Pause the speed slider has increments 0.25x, 0.5x, 1x, 2x, and 4x.
Remember, when SYNC is enabled, the speed slider and LIVE button apply to all items in layout. When SYNC is off, the speed slider and LIVE button apply only to the selected device.
To select a time segment
- Click-and-dragon the Timeline
- Right-click on the Timeline and choose Mark Selection Start(shortcut [). Right-click again and choose Mark Selection End (shortcut ]).
The selection will be highlighted with blue shading. Once a segment is selected, you can click-and-drag the edges to adjust its length.
You can also use the context menu to select Clear Selection or Zoom to Selection. If you click outside the selected segment the selection will be lost.
Viewing Exported Video:
As soon as export is finished, the extracted video clip(s) will be available under Local Files on the Resource Tree.
AVI, MKV and MP4 files are shown as a single record.
EXE and NOV files are contained in a folder and will display in a new tab.
Single camera and Bookmark exports are displayed as a single item.
When an exported Multi-Video is opened, it behaves like a standard layout and normal actions (arranging items, smart motion search, exporting video) can be applied.
Note: When viewing exported video, the start and end times of the exported segment display in the bottom right corner of the item.
Virtual Keypad (VK):
Don’t see the answer to your question above? Fill out this form so we can help you out: